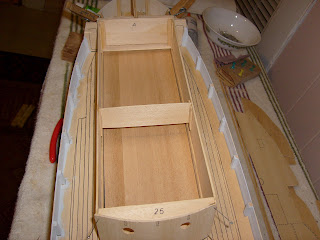
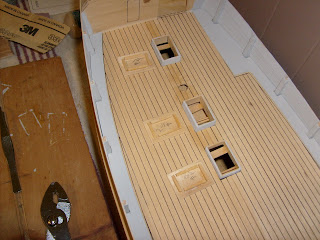
with the bow and the housing structures begun, this session I continued the build, wanting to flesh out more of the deck. I started by cementing the front wall panel on the lower cabin structure. then I went to work on the waterways, the borders along the bulwarks. I painted the bulwarks first....light gray....sounded like a good color to begin my paint scheme. they still had to be notched and fitted into place. the kit makes no provision for this, not being among the parts that make up this fine ship.
these border pieces are necessary in the planking of the deck. after they were fitted and painted, they were cemented into place.
as you can see, I also looked at the idea the if the portholes let in enough light, the bare deck beams could be seen. I decided to make a floor for the area within the structure.
the next step was to build the cargo holds. the cap needed to be removable for when it was time to plank the deck. you will note that reinforcements and tabs are used throughout this build. things that still need to be removed. the reinforcements give extra strength to assemblies and the tabs make it possible to assemble parts later in perfect alignment.
next came the water drain cutouts, I sort of cringed as I did it. I did not want to mess up the build, but it had to be done. I made up a template and traced them out on the bulwarks. in the back of my mind, I wanted to paint the hull, but every time I decided to do it, I kept thinking of things that had to be done before this could happen......NUTZ! the rub rails somehow mingled with this step of the build.....I don't know how, they just did.
in this last picture, I sealed the gaps around the bulwark ribs using the needle nozzle fitted on my tube of filler......I'm starting to find many uses for this handy little tool. you can find these "nozzles" at most hobby stores....like five in a package. thinning down the filler and cutting the tip down far enough to accept these nozzles tightly in it's opening, is the next thing to do to make this tool {I call it a tool.....application device}. I figured I'd give mention as to how I came by this means of extruding the filler in a very thin bead. I used a cotton swab to smooth out the filler around the ribs and remove the excess.
the next step was to install the cap rails, in order to carry on with the stern development. the lower stern plates depended on them in order to sit in place. to keep them level, I decided to install two pillars against the separation wall, the lower plate is the anchor point for the aft cabin skin. once they were cemented into place, I noticed that the wrap around of the cap rail was very uneven around the heel of the stern. I decided to trim this off and have it begin at the stern cap {at the hull}.
while this was going on, I decided to assemble the two helm deck halves, adding reinforcements to it as well. soon, it was time to call it a day...I stepped back to look at the progress I made. I am impressed with how well this build is going, seeing that this kit is over twenty years old.
I am almost out of the small square strip stock....I may go and get some, but I am satisfied with what there is.....I don't know....I'm not one who likes to skimp. well, I'm off to get stain for the deck planking......until next time...keep your bow above water and you masts to the sky!
AK-k-k-k-k-k-k-k!


